發表文章

目前顯示的是 4月, 2018的文章

長輩視訊-window端

圖片
這邊主要是接收Arduino傳過來的指令,我用C#做的。 程式執行視窗 用這程式控制下面的網頁 先選擇好com port 在點下start就能夠開始執行了 //#define open_chrome_64bit //#define dont_open_chrome using System; using System.Collections.Generic; using System.ComponentModel; using System.Data; using System.Drawing; using System.Linq; using System.Text; using System.Threading.Tasks; using System.Windows.Forms; using System.IO.Ports; //要使用serial port需要引用它 using System.Threading; using System.Diagnostics; using System.Runtime.InteropServices; namespace WindowsFormsApplication1 { public partial class Form1 : Form { StringComparer stringComparer = StringComparer.OrdinalIgnoreCase; SerialPort serialPort; bool continuethread = false; Thread readThread; int seriallifenum = 2; int seriallife; int serial_state = 0; public Form1() { InitializeComponent(); starbutton.Enabled = false; stopbutton.Enabled = false;

長輩視訊設備製作

圖片
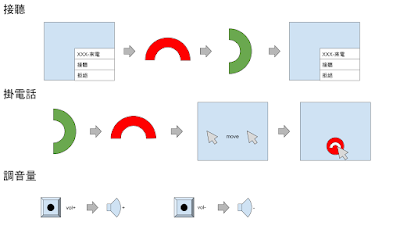
  家裡有長輩住在比較遠的地方,而他又不會用手機、視訊軟體,他只會用家裡電話跟我們互動,只要是3C或電器類都很難學習,所以我想說做一個更簡單的人機介面,本身是一個視訊電話,但卻只要向家裡電話一樣拿起來就能接聽。   起初我使用raspberry pi 加上python做,但後來發現視訊軟體本身在raspberry pi 上執行非常lag,延遲的情況嚴重,所以找了一台沒用的舊PC,但他只能跑windown XP,在win10的時代winXP真的很舊了,現在目前的視訊軟體都很少支援XP了,我主要考慮現在主流的幾個,使用者也才比較懂操作,有Line、Skype、google Hangouts,最後因Line、Skype桌面及網頁軟體都不支援winXP,所以用google Hangouts,主要是chrome在winXP上還跑得動,而且還很順,Hangouts網頁版相容度真的很高,但最後還是因為舊電腦處理速度及網路流量慢被閒置在一旁,但基本上我這套系統是可以支援win10的,因為我製作環境在win10測試也OK,所以設備升級應該有機會能用。 構想流程圖   我使用Arduino Serial跟PC 溝通下達指令,當用戶拿起話筒或放下話筒都會下達特定指令,跟PC說,PC 會操作滑鼠及鍵盤,而外我附加調整音量功能。 設備流程   人手操作 → arduino 透過USB傳送訊息 → PC接收訊息,操控滑鼠及鍵盤 使用物品 1.電話 2.arduino 3.PC 詳細資訊: 長輩視訊-arduino 長輩視訊-window端

長輩視訊-arduino

這邊主要是Arduino接收到人的動作所要下達的指令,還有與PC連線時,PC要確保USB還連線著,所以PC會定時傳訊息詢問連線狀態,Arduino要做回應。 code #define phonepin 6 #define audiopin 7 #define voluppin 4 #define voldownpin 5 #define audioctrlpin 3 #define earphonectrlpin 2 #define ledpin 13 int phonestate = 0; int phonestate_ = 0; int audio = 0; int audio_ = 0; int audiostate = 0; int volup = 0; int volup_ = 0; int voldown = 0; int voldown_ = 0; void setup() { // put your setup code here, to run once: pinMode(phonepin, INPUT); pinMode(audiopin, INPUT); pinMode(voluppin, INPUT); pinMode(voldownpin, INPUT); pinMode(audioctrlpin, OUTPUT); pinMode(earphonectrlpin, OUTPUT); pinMode(ledpin, OUTPUT); digitalWrite(audioctrlpin, HIGH); delay(10); digitalWrite(audioctrlpin, LOW); audiostate = 1; Serial.begin(9600); //Keyboard.begin(); if(phonestate == 0){ digitalWrite(ledpin, HIGH); }else{ digitalWrite(ledpin, LOW); } } void loop() { // put your main code here, to run repeatedly: //delay(30);