Tensorflow object detection api 訓練過程記錄
一、安裝
安裝時間有點久了,細節有些已經忘記,以下紀錄主要步驟1.Python 環境
Python 我是使用anaconda安裝python3.6
Tensorflow 1.14
pip install tensorflow=1.14
2.下載 Tensorflow object detection api
網址(https://github.com/tensorflow/models) ,這是tensorflow 官方文件,我解壓縮放在 C:\tensorflow\
這裡主要使用到的目錄是C:\tensorflow\models\research\object_detection
編譯protoc、測試安裝... (這部分細節忘了)
3.添加環境變數
C:\tensorflow\bin
C:\tensorflow\models\research\
C:\tensorflow\models\research\slim
二、建立dataset
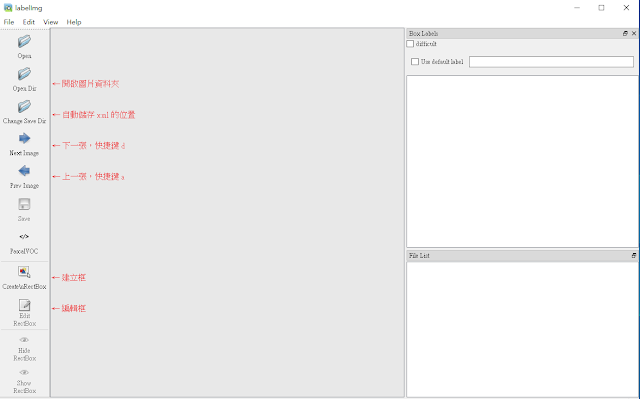
1.Dataset 標記工具使用 labelImg,輸出xml檔保存
開啟自動儲存
會儲存一個.xml檔
2.因為tensorflow 需要 tfrecord格式,所以要做數據轉換
建立train資料夾,放進訓練的圖片跟對應的xml檔
建立test資料夾,放進測試的圖片跟對應的xml檔將多個xml檔轉換成tfrecord檔
# -*- coding: utf-8 -*-
# xml_to_tfrecord.py

import os
import io
import glob
import pandas as pd
import tensorflow as tf
import xml.etree.ElementTree as ET

from PIL import Image
from object_detection.utils import dataset_util

flags = tf.app.flags

flags.DEFINE_string('image_path', '', 'Path to the image and .xml input')
flags.DEFINE_string('output_path', '', 'Path to output TFRecord')
FLAGS = flags.FLAGS

# 需要修改類别標籤
def class_text_to_int(row_label):
    if row_label == 'person':
        return 1
    else:
        None

def create_tf_example(row):
    full_path = os.path.join(os.path.dirname(os.path.abspath(FLAGS.image_path)+'\\'), '{}'.format(row['filename']))
#    with tf.gfile.GFile(full_path, 'rb') as fid:
    with tf.io.gfile.GFile(full_path, 'rb') as fid:
        encoded_jpg = fid.read()
    encoded_jpg_io = io.BytesIO(encoded_jpg)
    image = Image.open(encoded_jpg_io)
    width, height = image.size

    filename = row['filename'].encode('utf8')
    image_format = b'jpg'
    xmins = [row['xmin'] / width]
    xmaxs = [row['xmax'] / width]
    ymins = [row['ymin'] / height]
    ymaxs = [row['ymax'] / height]
    classes_text = [row['class'].encode('utf8')]
    classes = [class_text_to_int(row['class'])]

    tf_example = tf.train.Example(features=tf.train.Features(feature={
        'image/height': dataset_util.int64_feature(height),
        'image/width': dataset_util.int64_feature(width),
        'image/filename': dataset_util.bytes_feature(filename),
        'image/source_id': dataset_util.bytes_feature(filename),
        'image/encoded': dataset_util.bytes_feature(encoded_jpg),
        'image/format': dataset_util.bytes_feature(image_format),
        'image/object/bbox/xmin': dataset_util.float_list_feature(xmins),
        'image/object/bbox/xmax': dataset_util.float_list_feature(xmaxs),
        'image/object/bbox/ymin': dataset_util.float_list_feature(ymins),
        'image/object/bbox/ymax': dataset_util.float_list_feature(ymaxs),
        'image/object/class/text': dataset_util.bytes_list_feature(classes_text),
        'image/object/class/label': dataset_util.int64_list_feature(classes),
    }))
    return tf_example

def xml_to_csv(_path):
    xml_list = []
    for xml_file in glob.glob(os.path.abspath(_path) + '/*.xml'):
        tree = ET.parse(xml_file)
        root = tree.getroot()
        for member in root.findall('object'):
            value = (root.find('filename').text,
                     int(root.find('size')[0].text),
                     int(root.find('size')[1].text),
                     member[0].text,
                     int(member[4][0].text),
                     int(member[4][1].text),
                     int(member[4][2].text),
                     int(member[4][3].text)
                     )
            xml_list.append(value)
    column_name = ['filename', 'width', 'height', 'class', 'xmin', 'ymin', 'xmax', 'ymax']
    xml_df = pd.DataFrame(xml_list, columns=column_name)
    return xml_df

def main(_):
    global examples
    examples = xml_to_csv(os.path.abspath(FLAGS.image_path))
#    writer = tf.python_io.TFRecordWriter(FLAGS.output_path)
    writer = tf.io.TFRecordWriter(FLAGS.output_path)

    for index, row in examples.iterrows():
        tf_example = create_tf_example(row)
        writer.write(tf_example.SerializeToString())
    writer.close()
    print('Successfully created the TFRecords: {}'.format(os.path.abspath(FLAGS.output_path)))
    return 0

if __name__ == '__main__':
#    tf.app.run()
    tf.compat.v1.app.run()
輸入下面指令,將xml及image轉換成tfrecord格式:
python xml_to_tfrecord.py (image and xml資料夾位置) (tfrecord輸出位置及檔名)
python xml_to_tfrecord.py ./path/train ./path/train.record
python xml_to_tfrecord.py ./path/test ./path/test.record
三、訓練數據 (這邊以 ssd_mobilenet_v2_coco model 為例子)
1.建一個資料夾 train_model 放訓練要用的資料在train_model 下建立 data 資料夾,把剛剛轉換出來的 train.record、test.record放進train_model\data
建立label標籤文件,文件名稱person_label_map.pbtxt,格式可參考C:\tensorflow\models\research\object_detection\data裡的.pbtxt文件
item {
  id: 1
  name: 'person'
}
train_model\data 裡的資料有2.下載預訓練模型
下載官方預訓練模型將文件解壓縮放到train_model
例如下載 ssd_mobilenet_v2_coco
3.修改 ssd_mobilenet_v2_coco.config
將 C:\tensorflow\models\research\object_detection\samples\configs\ssd_mobilenet_v2_coco.config 複製一份到train_model裡面,修改 ssd_mobilenet_v2_coco.config以下內容
在train_model 下建立 training資料夾,等等放訓練後的ckpt檔案
將 C:\tensorflow\models\research\object_detection\samples\configs\ssd_mobilenet_v2_coco.config 複製一份到train_model裡面,修改 ssd_mobilenet_v2_coco.config以下內容
- num_classes: 90 #類別數量
- batch_size: 24 #根據機器性能調整
- #fine_tune_checkpoint: "PATH_TO_BE_CONFIGURED/ model.ckpt" #預訓練模型位置,可以修改為:
   fine_tune_checkpoint: "ssd_mobilenet_v2_coco_2018_03_29/model.ckpt"
- num_steps: 200000 #需要訓練的step
- train_input_reader
   input_path: "data/train.record"
   label_map_path: "data/person_label_map.pbtxt" # train eval共用label_map
- eval_input_reader
   input_path: "data/test.record"
   label_map_path: "data/person_label_map.pbtxt" # train eval共用label_map
- num_examples: 8000 # eval樣本數量,根據實際修改
在train_model 下建立 training資料夾,等等放訓練後的ckpt檔案
四、開始訓練
開啟cmd ,目錄轉到 train_model 資料夾python C:\tensorflow\models\research\object_detection\legacy\train.py --train_dir=./training --pipeline_config_path=./ssd_mobilenet_v2_coco.config --logtostderr
五、轉換成freeze model
目錄在 train_model 資料夾,選擇要轉換的 steps,例如model.ckpt-100python C:\tensorflow\models\research\object_detection\export_inference_graph.py --input_type image_tensor --pipeline_config_path ./ssd_mobilenet_v2_coco.config --trained_checkpoint_prefix training/model.ckpt-xxx --output_directory person_inference_graph
六、轉換成 opencv model格式(如果要用opencv load的話)
1.這裡需要兩個檔案person_inference_graph\frozen_inference_graph.pb
train_model\ssd_mobilenet_v2_coco.config
2.轉換成 opencv 格式的 pb檔
# pb_TF2CV.py
# -*- coding: utf-8 -*-
import os, sys
import argparse
import tensorflow as tf
from tensorflow.tools.graph_transforms import TransformGraph

def changPB(input_pb, output_pb):
    with tf.gfile.FastGFile(input_pb, 'rb') as f:
        graph_def = tf.compat.v1.GraphDef()
        graph_def.ParseFromString(f.read())
        graph_def = TransformGraph(graph_def, ['image_tensor'], ['detection_boxes', 'detection_classes', 'detection_scores', 'num_detections'], ['sort_by_execution_order'])
        with tf.gfile.FastGFile(output_pb, 'wb') as f:
            f.write(graph_def.SerializeToString())

def arg():
    parser = argparse.ArgumentParser(description='input arguments')
    parser.add_argument('-i', action='store', dest='input_pb', type=str, default=None)
    parser.add_argument('-o', action='store', dest='output_pb', type=str, default=None)
    args = parser.parse_args()
    if not (args.input_pb is not None and args.output_pb is not None):
        parser.print_help()
        sys.exit(1)
    print('input args:', args)
    return args

if __name__ == '__main__':
    args = arg()
    if not os.path.exists(args.input_pb):
        print('not found input pb file')
        sys.exit(1)
    outputfile = os.path.abspath(args.output_pb)
    output_folder = os.path.dirname(outputfile)
    if not os.path.exists(output_folder):
        print('not found output folder:', output_folder)
        sys.exit(1)
    changPB(args.input_pb, outputfile)
    sys.exit(0)
輸入下面指令,轉換成opencv格式的pb檔python pb_TF2CV.py -i frozen_inference_graph.pb -o sorted_inference_graph.pb
建立 opencv 格式的 graph_cv.pbtxt 下載 opencv v4.0 以後版本的 sources code
python path~\opencv\sources\samples\dnn\tf_text_graph_ssd.py --input sorted_inference_graph.pb --config sorted_inference_graph.pb --output graph_cv.pbtxt
七、python opencv load model
import cv2
import numpy as np

net = cv2.dnn.readNetFromTensorflow("sorted_inference_graph.pb", "sorted_inference_graph.pb")
Img = cv2.imread("image.png")
img = cv2.dnn.blobFromImage(img, 1.0, size=(300, 300), swapRB=True, crop=False)
net.setInput(img)
outs = net.forward()
outs = outs[0][0]
for i, obj in enumerate(outs):
    classId = obj[1]
    score = obj[2]
    bbox = obj[3:]
    Lx= bbox[0] * img.shape[1]
    Ly= bbox[1] * img.shape[0]
    Rx= bbox[2] * img.shape[1]
    Ry= bbox[3] * img.shape[0]
    cv2.rectangle(img, (int(Lx), int(Ly)), (int(Rx), int(Ry)), (0, 255, 255), thickness=1)
cv2.imshow('img', img)
cv2.waitKey(0)
cv2.destroyAllWindows()


留言
張貼留言