發表文章

Tensorflow object detection api 訓練過程記錄
圖片
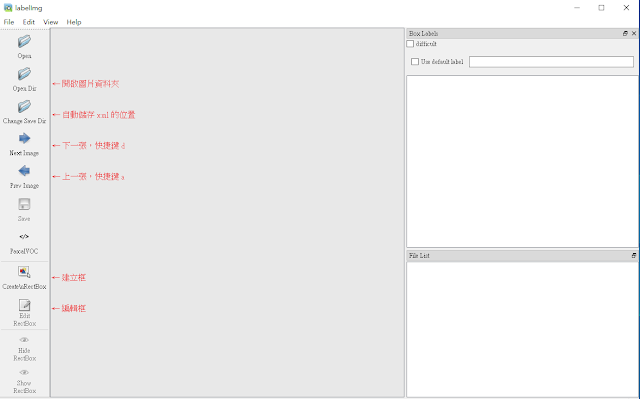
一、安裝 安裝時間有點久了,細節有些已經忘記,以下紀錄主要步驟 1.Python 環境     Python 我是使用anaconda安裝python3.6     Tensorflow 1.14 pip install tensorflow=1.14 2.下載 Tensorflow object detection api     網址(https://github.com/tensorflow/models) ,這是tensorflow 官方文件,我解壓縮放在 C:\tensorflow\     這裡主要使用到的目錄是C:\tensorflow\models\research\object_detection     編譯protoc、測試安裝... (這部分細節忘了) 3.添加環境變數     C:\tensorflow\bin     C:\tensorflow\models\research\     C:\tensorflow\models\research\slim 二、建立dataset 1.Dataset 標記工具使用 labelImg ,輸出xml檔保存 開啟自動儲存 會儲存一個.xml檔 2.因為tensorflow 需要 tfrecord格式,所以要做數據轉換     建立train資料夾,放進訓練的圖片跟對應的xml檔     建立test資料夾,放進測試的圖片跟對應的xml檔     將多個xml檔轉換成tfrecord檔 # -*- coding: utf-8 -*- # xml_to_tfrecord.py import os import io import glob import pandas as pd import tensorflow as tf import xml.etree.ElementTree as ET from PIL import Image from object_detection.utils import d...

jupyter server 單用戶及多用戶環境架設 安裝環境在windowns+anaconda

遠端 jupyter 使用anaconda 單一個用戶 server 端 開啟anaconda Prompt * 選擇環境,這邊環境名稱是'py36' (base) C:/Users/{username}>activate py36 產生default config file (py36) C:/Users/{username}>jupyter notebook --generate-config 設定密碼 方法一:使用shell (py36) C:/Users/{username}>jupyter notebook password 輸入密碼,此方法會產生json file 方法二:在python執行 from notebook.auth import password password() 將output複製起來 編輯 config file 開啟 C:/Users/{username}/.jupyter/jupyter_notebook_config.py * 刪除以下開頭的註解並編輯 c.NotebookApp.ip = '0.0.0.0' # '0.0.0.0'可自動更隨IP c.NotebookApp.port = 8888 # 不要和其他人重複 c.NotebookApp.open_browser = False # 不改的話會在dandanman桌面開啟瀏覽器 c.NotebookApp.password = '' # 若設定密碼是使用方法二,將複製的在這 c.NotebookApp.password_required = True c.NotebookApp.notebook_dir = 'C:/jupyter' # 預設開啟路徑 c.NotebookApp.default_url = '/lab' # 預設開啟jupyterlab 執行jupyter notebook (py36) C:/Users/{username}>jupyter notebook...

python opencv 基本讀取、轉換、顯示、儲存等

檔案位置關系 filename = 'yourfilename.jpg'  #與程式碼相同位置的檔案 filename = './file/yourfilename.jpg' #程式碼資料夾裡的資料夾中的檔案 filename = '../yourfilename.jpg' #程式碼上一層資料夾的檔案 讀取image 及 顯示 import cv2 filename = 'yourfilename.jpg'     #與程式碼相同位置的檔案 image = cv2.imread(filename)    #讀取照片 cv2.imshow("window title", image)  #顯示照片 儲存照片 import cv2 filename = 'yourfilename.jpg'      #與程式碼相同位置的檔案 image = cv2.imread(filename)    #讀取照片 cv2.imwrite("filename.jpg", image)  #儲存照片,試過的檔案格式 .jpg .png 照片尺寸大小取得 image = cv2.imread(filename)    #讀取照片 hight = image.shape[1] width = image.shape[0] 色彩空間轉換 這邊要注意rgb色彩空間在opencv裡排列方式是bgr image = cv2.imread(filename) yuv = cv2.cvtColor(image,cv2.COLOR_BGR2YUV) #RGB to YUV hsv = cv2.cvtColor(image,cv2.COLOR_BGR2HSV) #RGB to HSV gray = cv2.cvtColor(image,cv2.COLOR_BGR2GRAY) #RGB to gray gray = cv2.cvtColor(image,cv2.COLOR_GRAY2BGR) #gray to rgb 照片三層色分離 import cv2 filename = 'yo...

影像辨識model 不專業整理

classification: 只輸出是甚麼種類,像是貓、狗、人、車子等等。 vgg googlenet Object detection: 分類是甚麼種類並標記位置。 Tensorflow detection model zoo https://github.com/tensorflow/models/blob/master/research/object_detection/g3doc/detection_model_zoo.md 其他: Intel openvino mode 架構及說明 https://github.com/opencv/open_model_zoo/tree/master/intel_models caffe model https://github.com/BVLC/caffe https://github.com/BVLC/caffe/wiki/Model-Zoo https://software.intel.com/zh-cn/articles/installation-and-configuration-of-bvlc-caffe-under-windows-the-caffe-learning-notes-part1 https://github.com/Microsoft/caffe

Raspberry Pi 樹莓派做 BT 盒子教學-使用Deluged

圖片
用電腦遠端的方式叫樹梅派下載,由於新版的樹梅派作業系統raspbian 2017~2018.4期間的檔案用網頁下載不下來,每次下載都要5個小時以上,而且載到一半就失敗,這問題困擾了我很久,因為買新版的板子無法用舊版的raspbian,之後看到有人用這方式下載檔案,樹梅派官網也有提供BT種子,我就想說那就試試看吧!不然我也找不到有人丟檔案在網路上,都是丟官網連結。 這個方式是用樹梅派下載,所以可以將自己的PC關機他還是會繼續下載,而且功率消耗更低,可以做長期下載資料用。這是我覺得還蠻簡單的方法。 一、raspberry pi install deluged step: 1.先確認軟件到最新版 sudo apt-get update sudo apt-get upgrade 2.再來要查詢外接的 隨身碟 或 外接硬碟 是否有讀到 sudo fdisk -l 本來我看的教學是有掛載USB driver,我最後因為某些原因弄掉了   因為我搞到樹梅派當掉,硬拔電源,結果開不了機,最後把掛載的刪掉才重回新生 3.在USB裡建立你下載後儲存的資料夾 4.接下來就要安裝 Deluged sudo apt-get install deluged sudo apt-get install deluge-console 啟動測試看看 deluged 5.接下來要設定使用者 先將程式停掉,才能修改 sudo pkill deluged 保險一點先做備份 sudo cp ~/.config/deluge/auth ~/.config/deluge/auth.old 打開文件 sudo nano ~/.config/deluge/auth 在新的一行加入使用者 abc:1234:10        //用戶名稱:密碼:權限(10是最高) 6.啟動deluged deluged deluge-console 進入console config -s allow_remote True config allow_remote exit  //離開 二、PC deluged software install 1.安裝軟體 搜尋deluged找到你適合的作業系統安裝就好 2.進入設定se...

長輩視訊-window端

圖片
這邊主要是接收Arduino傳過來的指令,我用C#做的。 程式執行視窗 用這程式控制下面的網頁 先選擇好com port 在點下start就能夠開始執行了 //#define open_chrome_64bit //#define dont_open_chrome using System; using System.Collections.Generic; using System.ComponentModel; using System.Data; using System.Drawing; using System.Linq; using System.Text; using System.Threading.Tasks; using System.Windows.Forms; using System.IO.Ports; //要使用serial port需要引用它 using System.Threading; using System.Diagnostics; using System.Runtime.InteropServices; namespace WindowsFormsApplication1 { public partial class Form1 : Form { StringComparer stringComparer = StringComparer.OrdinalIgnoreCase; SerialPort serialPort; bool continuethread = false; Thread readThread; int seriallifenum = 2; int seriallife; int serial_state = 0; public Form1() { InitializeComponent(); starbutton.Enabled = false; stopbutton.Enabled = false; ...

長輩視訊設備製作

圖片
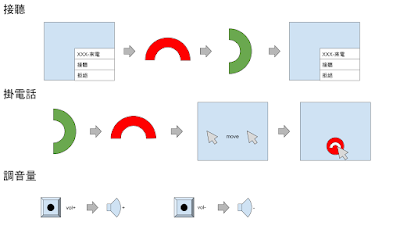
  家裡有長輩住在比較遠的地方,而他又不會用手機、視訊軟體,他只會用家裡電話跟我們互動,只要是3C或電器類都很難學習,所以我想說做一個更簡單的人機介面,本身是一個視訊電話,但卻只要向家裡電話一樣拿起來就能接聽。   起初我使用raspberry pi 加上python做,但後來發現視訊軟體本身在raspberry pi 上執行非常lag,延遲的情況嚴重,所以找了一台沒用的舊PC,但他只能跑windown XP,在win10的時代winXP真的很舊了,現在目前的視訊軟體都很少支援XP了,我主要考慮現在主流的幾個,使用者也才比較懂操作,有Line、Skype、google Hangouts,最後因Line、Skype桌面及網頁軟體都不支援winXP,所以用google Hangouts,主要是chrome在winXP上還跑得動,而且還很順,Hangouts網頁版相容度真的很高,但最後還是因為舊電腦處理速度及網路流量慢被閒置在一旁,但基本上我這套系統是可以支援win10的,因為我製作環境在win10測試也OK,所以設備升級應該有機會能用。 構想流程圖   我使用Arduino Serial跟PC 溝通下達指令,當用戶拿起話筒或放下話筒都會下達特定指令,跟PC說,PC 會操作滑鼠及鍵盤,而外我附加調整音量功能。 設備流程   人手操作 → arduino 透過USB傳送訊息 → PC接收訊息,操控滑鼠及鍵盤 使用物品 1.電話 2.arduino 3.PC 詳細資訊: 長輩視訊-arduino 長輩視訊-window端

長輩視訊-arduino

這邊主要是Arduino接收到人的動作所要下達的指令,還有與PC連線時,PC要確保USB還連線著,所以PC會定時傳訊息詢問連線狀態,Arduino要做回應。 code #define phonepin 6 #define audiopin 7 #define voluppin 4 #define voldownpin 5 #define audioctrlpin 3 #define earphonectrlpin 2 #define ledpin 13 int phonestate = 0; int phonestate_ = 0; int audio = 0; int audio_ = 0; int audiostate = 0; int volup = 0; int volup_ = 0; int voldown = 0; int voldown_ = 0; void setup() { // put your setup code here, to run once: pinMode(phonepin, INPUT); pinMode(audiopin, INPUT); pinMode(voluppin, INPUT); pinMode(voldownpin, INPUT); pinMode(audioctrlpin, OUTPUT); pinMode(earphonectrlpin, OUTPUT); pinMode(ledpin, OUTPUT); digitalWrite(audioctrlpin, HIGH); delay(10); digitalWrite(audioctrlpin, LOW); audiostate = 1; Serial.begin(9600); //Keyboard.begin(); if(phonestate == 0){ digitalWrite(ledpin, HIGH); }else{ digitalWrite(ledpin, LOW); } } void loop() { // put your main code here, to run repeatedly: //delay(30); ...

android 背景執行方法 IntentService、Service

圖片
此方法建議不要長期使用timer長期執行,因為手機螢幕關閉後呈待機狀態timer會停止運作,用sleep(1000)也是會停止計時,想做長期定時通知請看我做定時通知 那篇 。 IntentService是Service的簡易版,已內建一個thread,如果只是想用一個thread就好這個非常適合,建立IntentService比建立Service簡單。 IntentService、Service我做的實驗目前情況: IntentService在完全關閉activity後會停止(就是關掉手機佔存在背景activity) Service在完全關閉activity後也會停止,但是能透過重新啟動service的方式重新啟動,可是service的程式就要重新執行一遍。 service 的生命週期 建立class方式 在manifest.xml裡會有 <service android:name=".MyService" android:enabled="true" android:exported="true" /> 在activity啟動service方式 //open intentservice Intent intent = new Intent(this, NotificationService.class); Log.d(TAG, "service start"); startService(intent); Service public class MyService extends Service { public MyService() { } @Override public IBinder onBind(Intent intent) { // TODO: Return the communication channel to the service. throw new UnsupportedOperationException("Not yet implemented"); } @...

android 定時通知(永久長期的) 本篇只講AlarmManager使用

圖片
本篇使用AlarmManager達到準時執行某程式,跟鬧鐘的方式一樣,我之前用過IntentService、Service、Handler,都不能長期使用。 Servicer簡單缺點整理: IntentService:只要關閉activity背景保存視窗,IntentService背景所執行的程式就被強迫結束,好像可以重開(我沒試過)。 Service、Handler:雖然關閉activity會繼續執行,但他是重新在開啟一次service,這到還好,但當手機螢幕關閉處於待機狀態時,service會停止運作暫停在那邊,等你喚醒再繼續執行,所以用這個加timer做定時通知會整個亂掉,timer會停下來不數了。 AlarmManager主要架構是 跟系統註冊鬧鐘甚麼時間點 → 時間到系統會發送一個鬧鈴 → 你的activity接收那個鬧鈴後執行你的程式 當你註冊好幾個鬧鐘已經晚於現在時間,他會馬上通通都執行完 先建立接收鬧鈴的程式 在Manifest.xml 中加入接收系統鬧鈴 <application> <activity android:name=".MainActivity"> </activity> <!-- 當鬧鈴時間到達時要執行的程式 --> <receiver android:name=".AlarmReceiver"> <intent-filter> <action android:name="activity_app" /> </intent-filter> </receiver> </application> 建立一個class檔,執行接收到鬧鈴後的程式 public class AlarmReceiver extends BroadcastReceiver { @Override public void onReceive(Context context, Intent intent) { ...